ทุกวันนี้การใช้งาน Cloud เป็นที่แพร่หลาย ทั้งยังง่ายและราคาถูกกว่าเมื่อก่อนมาก ผมได้ลองใช้ Digital Ocean มาระยะหนึ่งเพื่อเทส App ประทับใจมากเนื่องจากราคาถูก และไม่ซับซ้อน แต่ก็ต้องแลกไปกับการที่เราต้องทำให้ส่วนของ Secure เอง (เคยโดน digital ocean ปิด Droplet เพราะโดนแฮ็กเข้ามาฝังมัลแวร์เป็นฐานยิง ddos -*- )
จากที่แพ็กเกจต่ำสุดจ่ายเดือนละ 5$ หรือ 160 กว่าบาท https://www.digitalocean.com/pricing/ ยังได้พื้นที่มาถึง 20GB ทั้งยังเป็น SSD Disk ด้วย เราจึงควรที่จะนำหลายๆเวปไซต์ (ที่ไม่ได้โหลดหนักมาก)มายัดใส่ไว้เพื่อความคุ้มค่าฝุดๆ 55555
Step 1
ทุก Domain ที่จะย้ายมาให้แก้ไขเนมเซิฟเวอร์ให้เป็นตามนี้
NS1.DIGITALOCEAN.COM

NS2.DIGITALOCEAN.COM

NS3.DIGITALOCEAN.COM
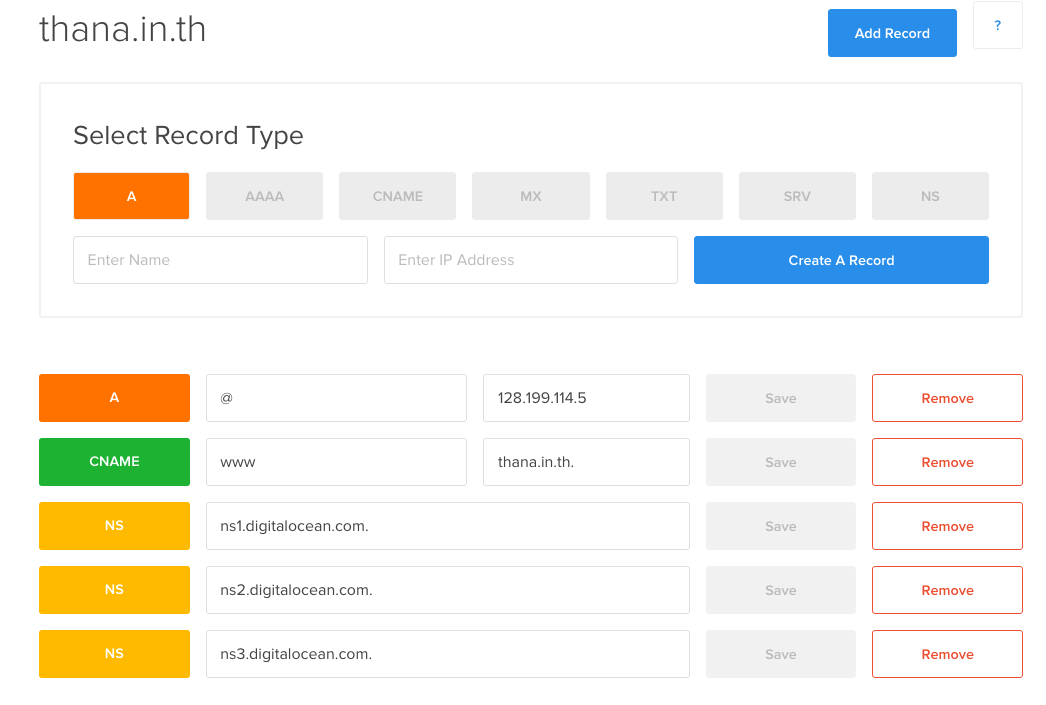
จากนั้นไปตั้งค่าที่เมนู dns ของ Digital Ocean ดังนี้
ใส่ชื่อ Domain เลือก droplet ที่ต้องการจากนั้นกด Create Record
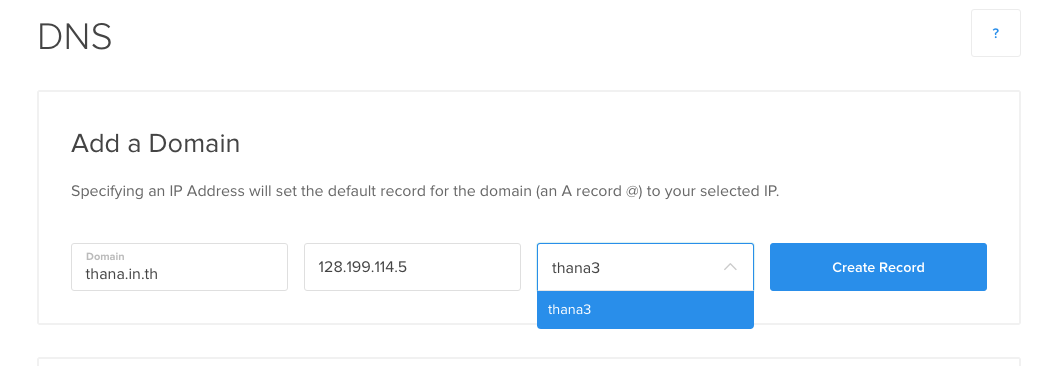
จากนั้นก็ตั้งค่าตามนี้
จากนั้นก็เพิ่ม Domain ที่ต้องการย้ายเข้ามาแบบเดียวกัน
Step 2
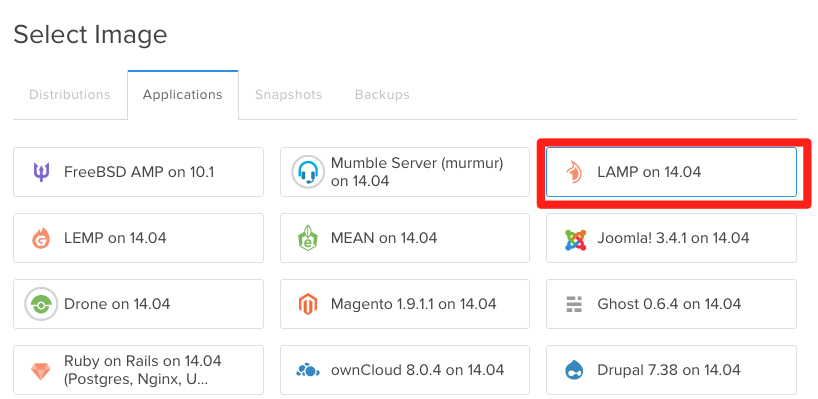
ติดตั้ง Ubuntu 14.04 LTS และติดตั้ง Apache ,PHP , Mysql หรือเลือกจาก Image LAMP Server ที่ Digital Ocean เตรียมไว้ให้ก็ได้
1) Create the Directory Structure
sudo mkdir -p /var/www/example.com/public_html

sudo mkdir -p /var/www/test.com/public_html
2) Grant Permissions
sudo chown -R $USER:$USER /var/www/example.com/public_html

sudo chown -R $USER:$USER /var/www/test.com/public_html
sudo chmod -R 755 /var/www
3) Let’s start with example.com. We can open up an index.html file in our editor by typing:
nano /var/www/example.com/public_html/index.html
In this file, create a simple HTML document that indicates the site it is connected to. My file looks like this:
<html>
  <head>
    <title>Welcome to Example.com!</title>
  </head>
  <body>
    <h1>Success!  The example.com virtual host is working!</h1>
  </body>
</html>
Success! The example.com virtual host is working!
Save and close the file when you are finished.
We can copy this file to use as the basis for our second site by typing:
cp /var/www/example.com/public_html/index.html /var/www/test.com/public_html/index.html
We can then open the file and modify the relevant pieces of information:
nano /var/www/test.com/public_html/index.html
<html>
  <head>
    <title>Welcome to Test.com!</title>
  </head>
  <body>
    <h1>Success!  The test.com virtual host is working!</h1>
  </body>
</html>
Success! The test.com virtual host is working!
4) Create the First Virtual Host File
Start by copying the file for the first domain:
sudo cp /etc/apache2/sites-available/000-default.conf /etc/apache2/sites-available/example.com.conf
Open the new file in your editor with root privileges:
sudo nano /etc/apache2/sites-available/example.com.conf
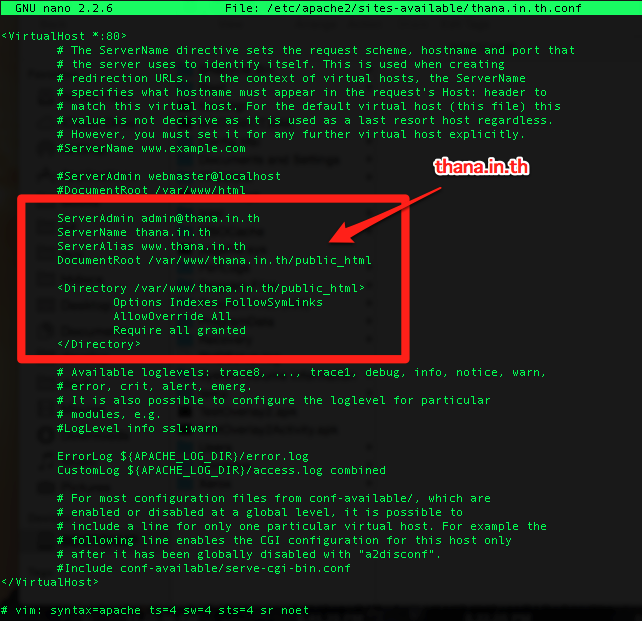
he only other thing we need to change for a basic virtual host file is the location of the document root for this domain. We already created the directory we need, so we just need to alter the DocumentRoot directive to reflect the directory we created:
DocumentRoot /var/www/example.com/public_html
In total, our virtualhost file should look like this:
ServerAdmin admin@example.com
ServerName example.com
ServerAlias www.example.com
DocumentRoot /var/www/example.com/public_html
<Directory /var/www/example.com/public_html>
Options Indexes FollowSymLinks
AllowOverride All
Require all granted
</Directory>
Save and close the file.
Copy First Virtual Host and Customize for Second Domain
5) Enable the New Virtual Host Files
We can use the a2ensite tool to enable each of our sites like this:
sudo a2ensite example.com.conf

sudo a2ensite test.com.conf
When you are finished, you need to restart Apache to make these changes take effect:
sudo service apache2 restart
ref:
https://www.digitalocean.com/community/tutorials/how-to-set-up-a-host-name-with-digitalocean
https://www.digitalocean.com/community/tutorials/how-to-set-up-apache-virtual-hosts-on-ubuntu-14-04-lts